Knock, knock. Who's there? It's Harald Gord and he's here to take your game to the next level. TLG's Gorflow and Wusubi have teamed up to deliver you a deck guide for one of the most satisfying lists that can currently be found on the ladder. The idea behind this Mystic Echo build is utilizing good special cards to set up a big Gord finisher.

Strengths:
- Threatening medium and short rounds, excels at bullying the opponent in Round 2
- Consistent, with a variety of ways to utilize your cards
Weaknesses:
- A relatively low amount of proactive plays can make for awkward situations
- This deck requires you to have access to your high provision cards and even with the added thinning tools, you can miss out on a key card which might cost you the game
Considerations:
- Thunder → Moon Dust or Waylay
While Thunder is universally good for removing most engines, Moon Dust can certainly find its use if you face too much Nilfgaard. It helps you deal with the pesky Hefty Helge. Waylay provides more value and still offers removal, which is useful in Scoia'tael mirrors.
Card breakdown
Feel free to skip this part of the guide if you're a more advanced player, who is familiar with the ins and outs of Scoia'tael. This is a combo-oriented deck with some nuance to it, so we feel like it's crucial to go over the most important synergies, especially for the newer players. Click on the spoiler below to see the explanation behind each card.

How to mulligan
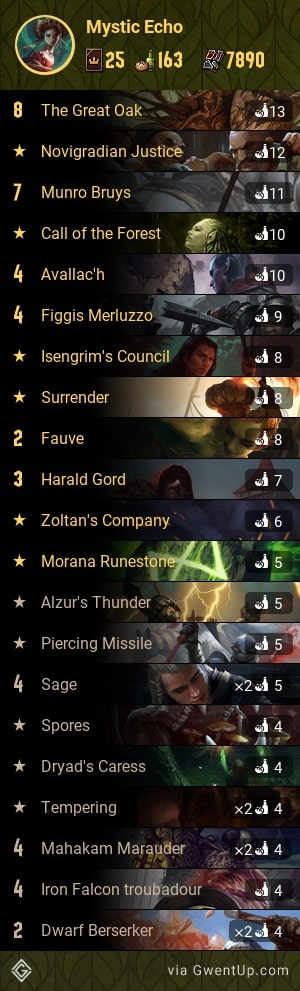
This deck wants to play as many special cards as possible to help Gord grow big and strong. The initial mulligan priority is Dwarf Berserker, followed by Mahakam Marauder. After that, you'll need to make a decision about how you would like to play your Sages in a given matchup and make your remaining mulligans based off of that. Be aware that you will have to maintain a Nature card in the deck for Fauve and one or two Bronze Dwarves for Novigradian Justice.
Sage can be mulliganed especially when you have Avallac'h in hand. Isengrim's Council is then guaranteed to pull Sage at 6 power, outside of removal range. You can also keep Troubadour and one Sage in hand, since the 2 armor effectively protects the Sage. It's rarely correct to mulligan Tempering since it's a threatening card when combined with Berserker. Feel free to mulligan Spores if you know it isn't going to find any value in the specific round.
Round 1: Bring out the Sages!
In the first round, your Sages will be doing the bulk of the heavy lifting. Providing an extra 2 points for every spell you play, these little beauties will allow you to quickly skyrocket ahead of your opponent. The trick, however, is getting them to stick on the board. There are some removal tools that can easily shut down the vulnerable 4 strength Sage.
Assassination, Tourney Joust, Alzur's Thunder, Stunning Blow and Natural Selection all pose a threat. Luckily, this deck is equipped with multiple tools to help your Sages survive past the turn that they're played. Still working on your matchup knowledge? Don't worry, we've got you covered. Here are your options for protecting Sages against the common threats.
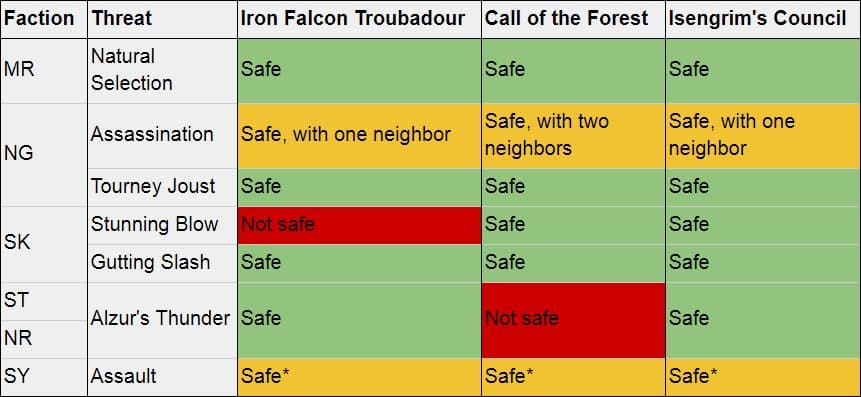
*Sages brought out in this way are safe against Assault as long as the opponent doesn't have 2 or more Salamandra units on the board. If they open with Azar Javed, you better pray they didn't draw Assault.
Isengrim's Council is guaranteed to pull Fauve and your only three Elves are Avallac'h and two Sages. It also grants the tutored card a 2-point boost. That boost is paramount for Sages, as it will bring them from easy-to-remove 4 strength to a hefty you-can't-mess-with-me 6 strength.
Similarly, Call of the Forest can be used to directly tutor a Sage with a 1-point boost. Not much, but enough to get the job done in certain matchups. Keep in mind that you would much rather use Call for your crucial gold cards. Finally, this deck includes a single copy of Iron Falcon Troubadour. If you have a Sage in hand, you can play this little fella to armor him up. With that said, be wary of Stunning Blow if you are considering this option.
Once the Sages are down, play your specials and do your best to win Round 1 without going down more than one card. Winning Round 1 is very important for this deck for two reasons. First of all, it grants you the last say. Having the last say protects the invaluable Harald Gord against any kind of tall punishment your opponent might be saving.
Most importantly, winning the first round gives you control over the game, meaning that you can actually do something in Round 2 instead of getting dry passed and losing to some completely random stuff in a long Round 3.
Round 2: Cirque du Berserk
So ideally you have won Round 1 and now you're facing down your opponent in Round 2 with full control over the game. For many other decks, it may be safe to dry pass here and take the opponent into a long Round 3. Gord doesn't do that. Why, you may ask? To put it simply: you don't have to. Pushing in Round 2 does put you at risk of losing card advantage, but done correctly, it can put your opponent into an awkward position, forcing them to make difficult decisions.
This deck doesn't get much extra value from a longer round (6+ cards) like some other decks. In that sense, it is weaker in longer rounds, but much more flexible overall. The goal of the Round 2 push isn't necessarily to 2-0 the opponent, but to force them to play suboptimally.
For instance, Mystic Echo Harmony opponents are forced to play Water of Brokilon, a card they prefer to play twice in a long round. Similarly, Mystic Echo Dwarves will be forced to play their Novigradian Justice. Blood Scent opponents must consider committing leader charges and vital resources like Portal into Garkains and Orianna.

Hopefully, you're convinced that the Round 2 push is worth it, so let's get going. Now it's time to BERSERK the opponent! Despite being little, Dwarf Berserkers do a respectable amount of damage and in some situations you may find yourself playing 6 of them. They're great for pushing Round 2, because you're the one who's in control. That means the opponent cannot limit Berserker value by passing. Berserkers are your primary target for Novigradian Justice in this deck, making Justice an overpowered 14-point-play with potential removal value.
Additionally, this deck can set up for Munro Bruys to spawn two more Berserkers in two different ways: Zoltan's Company and Figgis Merluzzo. User your best discretion to determine which of these resources you'd like to commit in Round 1 and in Round 2. Keep in mind that while you might find yourself going a card down at the beginning of the Round 2 push, it's crucial to just have faith and push onward with optimal sequencing. The nature of the Round 2 push is that the opponent must at times play suboptimally or risk giving you a very good opportunity to pass.
Once you feel that your opponent has committed their vital resources, try to find a pass in which you will enter Round 3 on even cards. If they don't respect your Round 2 push and you suspect that they're holding onto their win conditions for Round 3 instead of playing them, it may be prudent to keep your foot on the gas and potentially look for a 2-0.
Round 3: His name is Gord
One way or another, you've entered Round 3. In the ideal scenario, you have retained your leader ability, have the last say and Gord is sitting in your hand, waiting to cash in on the dozen specials you have played during the match. But after all, things don't always go so smoothly. Maybe you never drew Gord.
In that case, hopefully you didn't commit the leader ability during the Round 2 push, because replaying Call of the Forest is your get out of jail free card. Never drew your Call? Sounds like you need to get more SKILLED. All jokes aside, Round 3 is the easiest of the three. Play out your remaining cards to the best of your ability and slam Harald Gord as your big finisher. This way, your opponent can't react and murder him with tall punishment.
Addendum
This guide only describes what we consider to be the ideal way of playing Mystic Echo Gord. And that's winning Round 1, pushing your opponent in Round 2 and then finishing off with a short Round 3 where Gord emerges victorious. However, it's just that - a guide. There will be matchups where draws or circumstances force you to go off the rails. You may have to play your Novigradian Justice early, sometimes you don't draw it. You can miss both Sages in Round 1, or god forbid your essential golds like The Great Oak or Munro Bruys.
In some cases, you might lose Round 1 and/or find yourself in a long Round 3. Learning how to approach these situations simply takes practice, we can only suggest watching our Youtubers and Twitch streamers. It's also very important to not be discouraged by suboptimal conditions. This deck provides a lot of flexibility and options, so make use of them and put the opponent in the dumpster, where they rightfully belong.
Leave a Reply